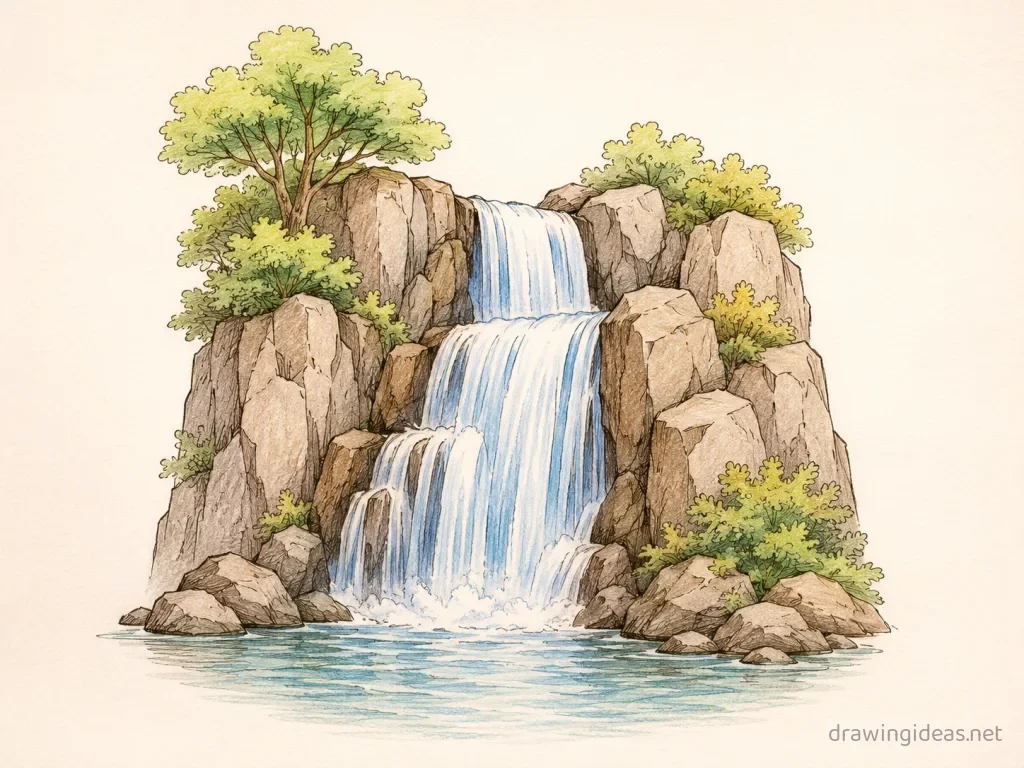
Waterfall Drawing: Step-by-Step Tutorial & Easy Ideas
Waterfall drawings are one of the most-loved sketching subjects, and for good reason — the basic version comes together from a horizon line and two or three big simple shapes in just a few minutes. Follow the six steps below to get the foundations right, then browse the ideas list for your next waterfall sketch.
- Difficulty Medium
- Time ~15 min
- Tools Pencil, eraser, paper
- Starts with a horizon line and two or three big simple shapes
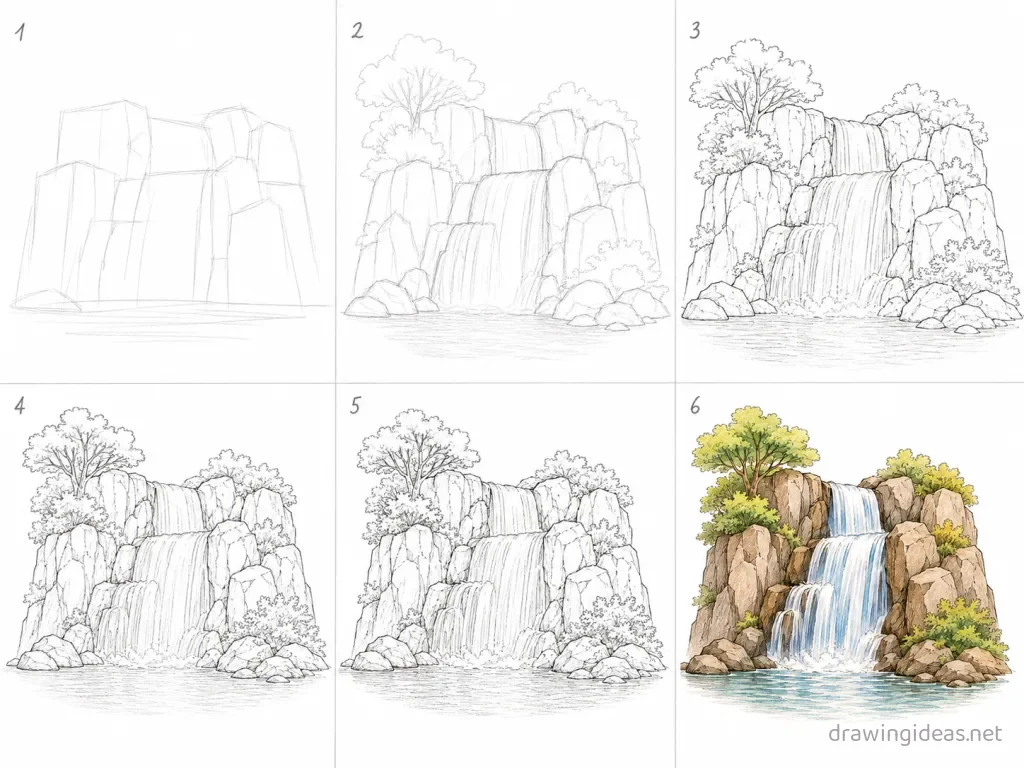
How to Draw a Waterfall Step by Step
-
Set the horizon and main mass
Place a light horizon line first, then block the main shape of the waterfall as one simple form. Composition beats detail in every landscape-type drawing.
-
Establish the big shapes
Break the scene into 3–4 large shapes maximum, working from the biggest element down. Squint at your reference — whatever survives the squint is what you draw.
-
Define the edges
Give each shape its characteristic edge: crisp for rock and structures, broken and wobbly for organic forms, soft for anything atmospheric.
-
Layer foreground to background
Make closer elements larger, darker, and more detailed; let distant ones stay lighter and simpler. This overlap-and-fade is what creates depth on flat paper.
-
Add the signature details
Now add the few details that identify the waterfall — but only in the focal area. Detail everywhere flattens the drawing; detail in one place directs the eye.
-
Unify with tone
Add shading in one consistent light direction across every element, then deepen the darkest shadows and lift a few highlights with your eraser.
Waterfall Drawing Ideas to Try Next
Once the basic waterfall clicks, run it through these variations — each one practices a different skill while staying on a subject you already know.
-
A tiny waterfall in a glass jar
The miniature-world trend: your waterfall scene bottled with a cork on top.
-
Day and night split waterfall
Divide the page down the middle and render the same waterfall in both lightings.
-
Waterfall at golden hour
Same drawing, warm palette, long shadows — light does the heavy lifting.
-
A postcard-style waterfall
Frame it in a rectangle with a hand-lettered greeting — vintage travel poster energy.
-
Waterfall through a window frame
Draw a simple window and place the waterfall outside it — built-in composition and cozy mood.
-
Waterfall with a wanderer figure
One tiny silhouette person gazing at your big waterfall — instant scale and story.
-
A minimalist one-line waterfall scene
Reduce the waterfall to its simplest continuous line — modern, framable, and fast.
Tips for Better Waterfall Drawings
- Squint at your reference until it blurs into 3–4 big shapes — draw those shapes first. Every landscape that "looks off" skipped this step.
- Detail only the focal area and let the edges stay loose. The viewer’s eye goes where the detail is; detail everywhere means focus nowhere.
Not feeling the waterfall today?
Let the generator pick your next subject — filtered by mood and difficulty.
🎲 Random Drawing GeneratorWaterfall Drawing FAQ
What is the easiest way to draw a waterfall?
Start with a horizon line and two or three big simple shapes, keeping your lines light. Refine the outline, add the defining details, then erase the construction shapes. The six-step method above breaks this down — most people get a recognizable waterfall on their very first try with it.
How long should it take to draw a waterfall?
A simple waterfall drawing takes about 15 minutes following this tutorial. A quick doodle version can be done in two or three minutes, while a detailed, fully-shaded study might take an hour. Speed comes with repetition — the second attempt is always faster than the first.
What supplies do I need for waterfall drawings?
Just a pencil, an eraser, and any paper. An HB pencil for construction lines and a 2B for final outlines is a nice upgrade, and colored pencils or markers finish it off — but nothing on this page requires special supplies.
Can kids draw a waterfall?
Yes — the waterfall is very manageable once you use construction shapes, and this method was written for first-timers. Kids can follow the same steps; just expect wobblier lines and more charm.