Fishing Drawing: Step-by-Step Tutorial & Easy Ideas
If you can draw a light proportion framework, you can draw fishing. That's genuinely the whole secret — the rest is knowing which lines to add in which order, and this tutorial shows you exactly that, step by step, before serving up a full list of fishing drawing ideas to practice with.
- Difficulty Hard
- Time ~25 min
- Tools Pencil, eraser, paper
- Starts with a light proportion framework
How to Draw Fishing Step by Step
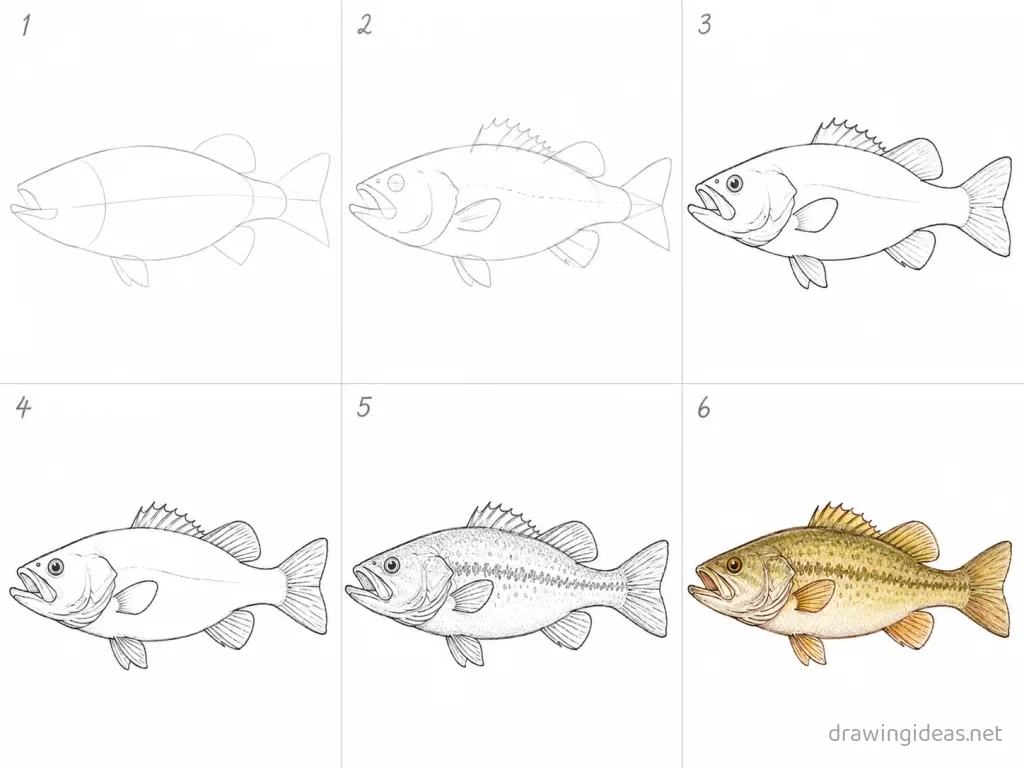
-
Start with light proportions
Block in the basic proportions first with light lines — for faces, an oval with a center line and an eye line halfway down; for figures, a simple head-count ruler.
-
Map the landmarks
Place the key landmarks before drawing any feature in full: eye corners, nose base, mouth line, jaw edge, or the joints if you're drawing more of the body.
-
Draw the big forms
Work from large to small: the overall shape of fishing first, then major planes, and only then individual features. Detail added too early always ends up in the wrong place.
-
Refine the features
Now draw each feature carefully, constantly checking distances between them. In faces and figures, the spaces BETWEEN features matter more than the features themselves.
-
Add hair and clothing
Draw hair as a few large masses (never strands), and clothing with fold lines only at joints and stress points.
-
Shade the forms
Choose one light direction and shade the planes facing away from it — under the brow, nose, chin, and along one side. Soft, gradual shading suits skin.
Fishing Drawing Ideas to Try Next
Once the basic fishing clicks, run it through these variations — each one practices a different skill while staying on a subject you already know.
-
Hands holding something small
A mug, a phone, a flower — drawing hands WITH objects is easier than empty hands, and endlessly useful.
-
A back-view fishing
No face required: hair, shoulders, and posture carry everything. The most confidence-building people drawing there is.
-
A gesture-pose minute study
Set a timer for 60 seconds and capture just the motion line and weight — repeat five times, keep the best.
-
A cozy bundled-up figure
Big coat, big scarf, small visible face — winter clothing hides anatomy while you practice everything else.
-
Fishing in profile silhouette
One side-view outline filled solid black — profile practice with a dramatic result.
Tips for Better Fishing Drawings
- Eyes sit at the vertical middle of the head — everyone places them too high at first. Measure it once on any photo and you’ll never unsee it.
- Draw the spaces between features, not just the features. The distance from nose to mouth matters more than the nose or the mouth.
Not feeling fishing today?
Let the generator pick your next subject — filtered by mood and difficulty.
🎲 Random Drawing GeneratorFishing Drawing FAQ
What is the easiest way to draw fishing?
Start with a light proportion framework, keeping your lines light. Refine the outline, add the defining details, then erase the construction shapes. The six-step method above breaks this down — most people get a recognizable fishing on their very first try with it.
How long should it take to draw fishing?
A simple fishing drawing takes about 25 minutes following this tutorial. A quick doodle version can be done in two or three minutes, while a detailed, fully-shaded study might take an hour. Speed comes with repetition — the second attempt is always faster than the first.
What do I need to draw fishing?
Just a pencil, an eraser, and any paper. An HB pencil for construction lines and a 2B for final outlines is a nice upgrade, and colored pencils or markers finish it off — but nothing on this page requires special supplies.
Why is drawing fishing so hard?
Fishing drawings usually go wrong at the proportion stage, not the detail stage. The fix is to spend more time on the basic shapes (steps 1–2) and check them before adding anything else — and use the tip above, which addresses the single most common fishing mistake.