Seal Drawing: Step-by-Step Tutorial & Easy Ideas
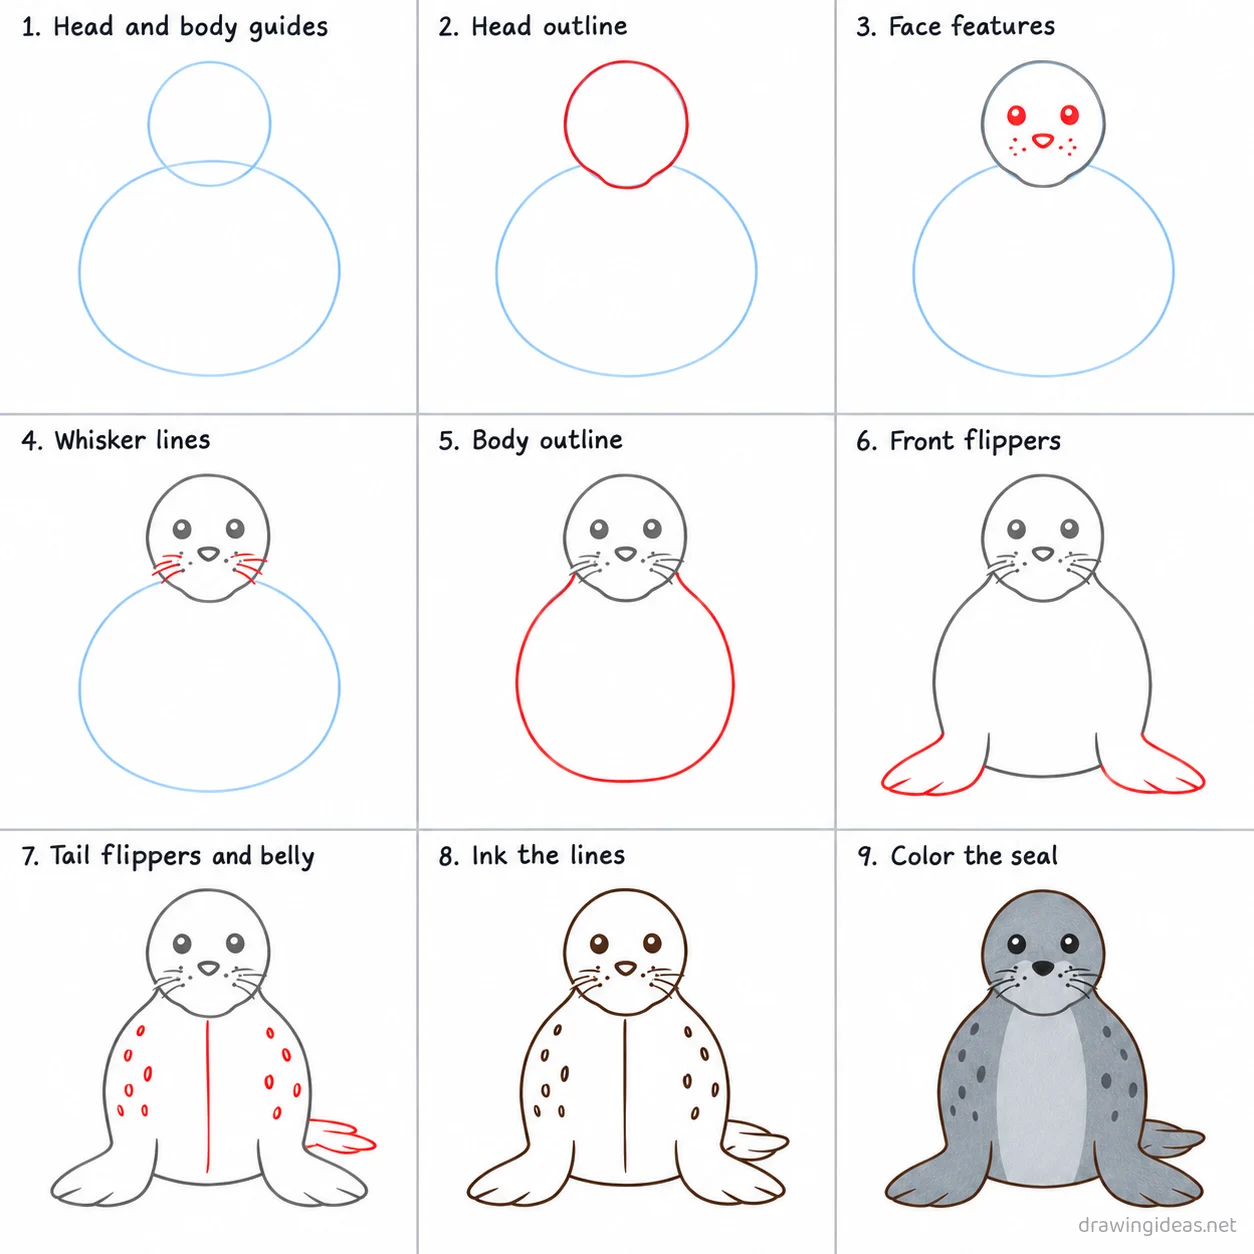
Want to draw a seal that actually looks right? Start with a circle for the head and an oval for the body and build from there. This page covers the full process — nine steps from first line to finished drawing — followed by seal drawing ideas in every style: easy, cute, realistic, and a few you probably haven't tried.
- Difficulty Easy
- Time ~15 min
- Tools Pencil, eraser, paper
- Starts with a circle for the head and an oval for the body

How to Draw a Seal Step by Step
Step 1 of 9
Head and body guides
Draw a light circle for the head near the top of the page, then a wide oval below it for the body, overlapping the circle's bottom edge.
-
Head and body guides
Draw a light circle for the head near the top of the page, then a wide oval below it for the body, overlapping the circle's bottom edge.
-
Head outline
Trace the head circle into a rounded shape that tapers gently toward a blunt snout at the bottom.
-
Face features
Add two round eyes on the upper head, a small oval nose below them, and a few whisker dots on each side of the snout.
-
Whisker lines
Add three thin whisker lines fanning outward from each side of the nose.
-
Body outline
Trace the body oval into a rounded shape, wide at the shoulders and tapering toward the rear.
-
Front flippers
Add two wide flat flippers pressed against the ground beneath the shoulders, propping up the front of the body.
-
Tail flippers and belly
Add two small tail flippers peeking out behind the body, then a gentle curved line down the front for the chest.
-
Ink the lines
Go over every kept line with dark ink, then erase the light head circle and body oval guides.
-
Color the seal
Fill the body silver gray with darker spots, the belly a lighter gray, and the nose and eyes black.
Seal Drawing Ideas to Try Next
Once the basic seal clicks, run it through these variations — each one practices a different skill while staying on a subject you already know.
-
A baby seal next to its parent
Same drawing twice at two sizes with bigger eyes on the little one — instant "aww" with skills you already have.
-
A seal in its natural habitat
Add two or three environment elements behind your seal — the scene sells the story without needing a full background.
-
Seal face close-up portrait
Crop to just the face and make the eyes the star. Big expressive eyes carry the whole piece.
-
Continuous one-line seal
Draw the whole seal without lifting your pen. Great warm-up, and the wobbles are the style.
-
A sleeping seal curled up
Sleeping poses tuck away the legs and face details — draw one restful curve and let the pose forgive the anatomy.
-
A cartoon seal with a tiny accessory
Round everything, shrink the body, add one hat/bow/scarf. Accessories add personality for nearly zero extra difficulty.
-
A geometric low-poly seal
Build the seal from straight-edged triangles only — a modern design look that secretly teaches structure.
-
A seal peeking around a corner
Half the animal hides behind an edge — you draw the easy half and the composition feels playful.
Tips for Better Seal Drawings
- Draw the gesture line first — one curve through the spine from nose to tail. Animals drawn from the spine out always feel alive; animals drawn from the outline in always feel stuffed.
- Compare proportions to something you know: how many heads long is the body? Where do the legs attach? Two measurements taken early save twenty corrections later.
Not feeling the seal today?
Let the generator pick your next subject — filtered by mood and difficulty.
🎲 Random Drawing GeneratorSeal Drawing FAQ
What is the easiest way to draw a seal?
Start with a circle for the head and an oval for the body, keeping your lines light. Refine the outline, add the defining details, then erase the construction shapes. The nine-step method above breaks this down — most people get a recognizable seal on their very first try with it.
How long does a seal drawing take?
A simple seal drawing takes about 15 minutes following this tutorial. A quick doodle version can be done in two or three minutes, while a detailed, fully-shaded study might take an hour. Speed comes with repetition — the second attempt is always faster than the first.
What supplies do I need for seal drawings?
Just a pencil, an eraser, and any paper. An HB pencil for construction lines and a 2B for final outlines is a nice upgrade, and colored pencils or markers finish it off — but nothing on this page requires special supplies.
Can kids draw a seal?
Yes — the seal is one of the friendlier subjects for beginners, and this method was written for first-timers. Kids can follow the same steps; just expect wobblier lines and more charm.