Cute Cat Drawing: Kawaii Step-by-Step Tutorial
This tutorial turns a cat into its most adorable self: chibi proportions, big sparkly eyes, soft rounded shapes. It starts from the same two circles — a small one for the head on a larger one for the body as the classic version — then applies the kawaii formula on top. Perfect for journals, stickers and cards.
- Difficulty Easy
- Time ~9 min
- Tools Pencil, eraser, paper
- Starts with two circles — a small one for the head on a larger one for the body
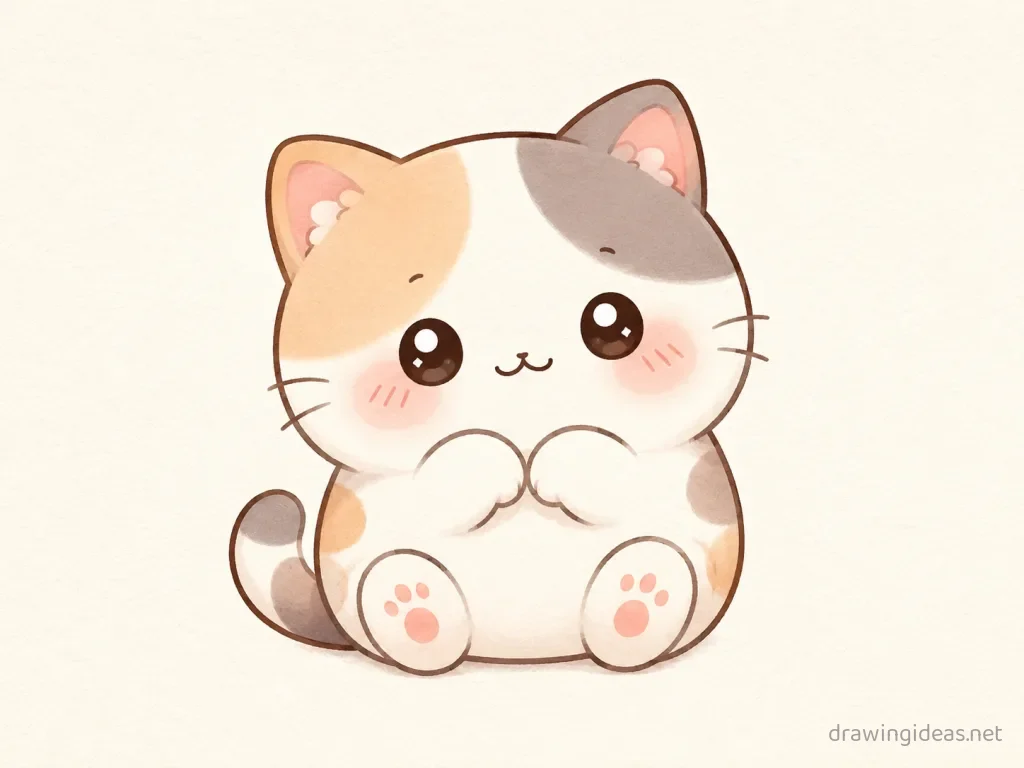
How to Draw a Cute Cat, Step by Step
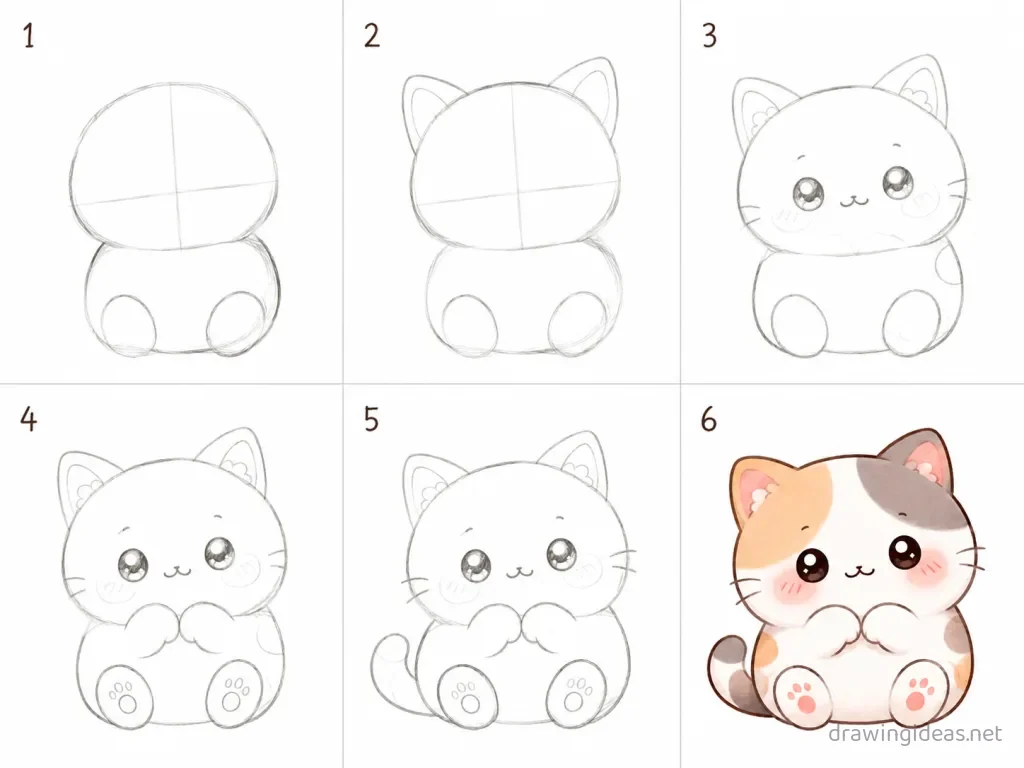
-
Block in the head and body
Draw a circle for the head and a larger oval below it for the body. Rounder is cuter — soften every corner you just drew.
-
Add triangle ears
Place two triangles on top of the head, slightly tilted outward. Exaggerate: whatever you just drew, make it 20% chubbier.
-
Draw the face
Two almond-shaped eyes halfway down the head, a tiny triangle nose, and a mouth like the letter ω right under it. Keep details minimal; cuteness lives in the big shapes.
-
Shape the front legs and paws
Drop two nearly straight lines from the chest to the ground and finish each with a rounded paw. Curves only — replace any straight line with a gentle arc.
-
Add the back haunch and tail
Draw a big round haunch on the side of the body, then sweep a thick tail curling around the front paws. Shrink this detail smaller than the realistic version would have it.
-
Whiskers, fur, and cleanup
Erase the construction circles, flick out three whiskers per cheek, and break the outline with tiny fur strokes on the chest and haunch. Finish with softness: light pressure, rounded ends on every stroke.
Want the full detailed version?
The complete Cat drawing tutorial covers proportions, texture and shading in depth.
Full Cat Drawing Tutorial →Cute Cat Drawing Ideas
Continuous one-line cat
Draw the whole cat without lifting your pen. Great warm-up, and the wobbles are the style.
A cat in its natural habitat
Add two or three environment elements behind your cat — the scene sells the story without needing a full background.
A geometric low-poly cat
Build the cat from straight-edged triangles only — a modern design look that secretly teaches structure.
A baby cat next to its parent
Same drawing twice at two sizes with bigger eyes on the little one — instant "aww" with skills you already have.
A sleeping cat curled up
Sleeping poses tuck away the legs and face details — draw one restful curve and let the pose forgive the anatomy.
A cartoon cat with a tiny accessory
Round everything, shrink the body, add one hat/bow/scarf. Accessories add personality for nearly zero extra difficulty.
Cute Drawing Tips
- Keep the mouth tiny. A small "w" or dot mouth reads sweeter than a big smile on chibi proportions.
- The cuteness formula is proportions, not details: bigger head, smaller body, larger eyes set lower on the face. Push each further than feels reasonable.
- Add blush marks (two small ovals under the eyes) and a tiny highlight in each eye — these two touches do half of all kawaii work.
FAQ
How do you make cat drawing look cute?
Three moves: enlarge the head relative to the body, enlarge the eyes and place them lower on the face, and round off every corner. Finish with blush marks and a white highlight dot in each eye.
What are kawaii cat drawings used for?
Journals, planner decorations, stickers, greeting cards and phone doodles — the style is compact and works at small sizes, which is why it dominates sticker sheets.
Do I need to follow the regular cat tutorial first?
No — this page stands alone. But if you want the anatomy behind the cuteness, the full cat drawing tutorial covers the realistic construction in six steps.